What Is a Static Website?
A static website is a website that displays the same content for every viewer. The content is stored on a web server and is coded in HTML, CSS, and JavaScript. Ideally, the content will not change on the page until the site developer makes any changes.
How Do Static Websites Work?
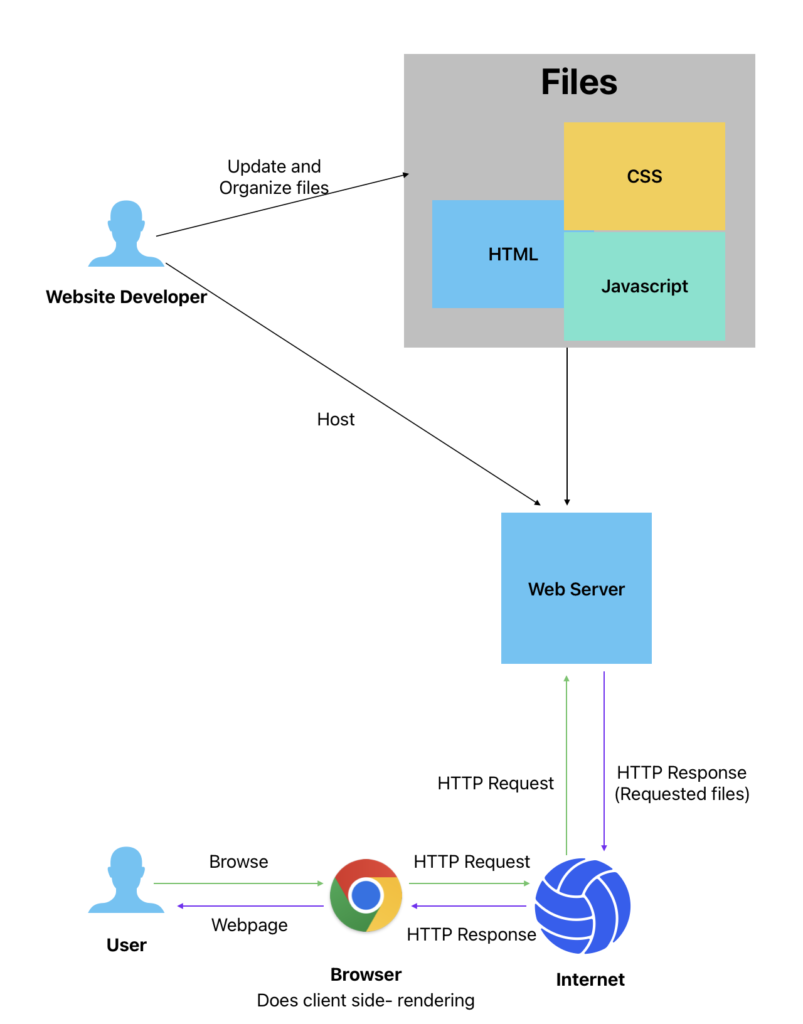
Static websites serve pre-built HTML, CSS, and JavaScript files directly to the user’s browser without needing server-side processing or database queries. Unlike dynamic websites that generate content on the server in response to user requests, static websites deliver fixed, unchanging content to all users.
The static website files can be hosted on a web server. This server can be a traditional web server, a content delivery network (CDN), or a specialised static site hosting service.
Upon receiving the request, the server simply returns the requested files to the user’s browser. Since the content is pre-built and doesn’t change dynamically, the server doesn’t need to perform any server-side processing.
The user’s browser receives the HTML, CSS, and JavaScript files and renders the webpage locally. The browser handles any client-side interactivity or dynamic behaviour using JavaScript.
The browser is responsible for showing the visual appearance to the user according to the file contents.
The complete webpage is loaded in the user’s browser, and they can navigate between different pages by clicking links or interacting with the site. The website tends to load quickly since there’s no server-side processing during user interactions.
Advantages of using static Websites:
- Speed: Static websites are generally faster because no server-side processing or database queries are involved.
- Simplicity: They are easier to develop and maintain since they don’t require a server-side codebase or database management.
- Security: With fewer components and no server-side processing, static websites can be more secure and less vulnerable to certain types of attacks.
Limitations:
- Interactivity: Static websites are limited in terms of dynamic content and user interactivity since most of the processing happens on the client side.
- Scalability: Managing content on a large scale can become cumbersome as each change requires manual updates to the static files.
- Dynamic Content: If your website requires real-time or frequently updated content, a static approach might not be suitable.
What are the deployment options?
GitHub Pages
GitHub Pages is a static site hosting service that takes HTML, CSS, and JavaScript files straight from a repository on GitHub, optionally runs the files through a build process, and publishes a website.
Step 1: Create Your Static Website
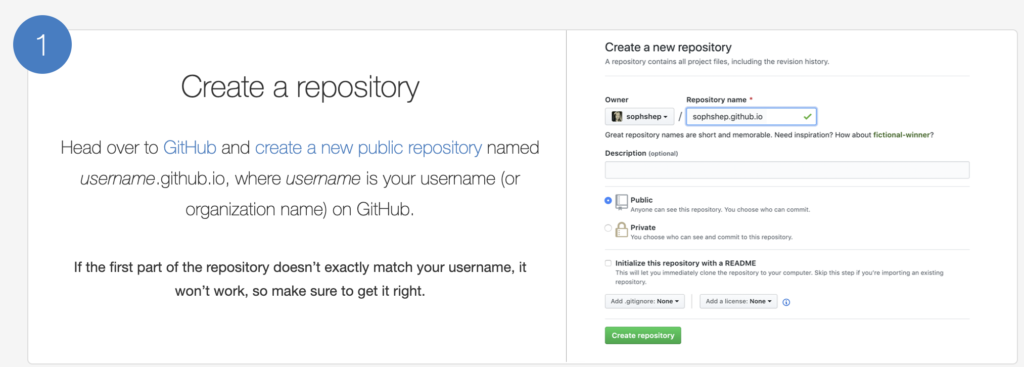
Step 2: Create a GitHub Repository
- Sign in to GitHub. If you don’t have a GitHub account, sign up at GitHub.
- Create a New Repository:
- Click on the “+” in the top right corner of the GitHub homepage.
- Choose “New repository.”
- Enter a repository name.
- Optionally, add a description.
- Click “Create repository.”
Step 3: Push Your Code to GitHub
# Navigate to your project folder
cd /path/to/my-static-website

# Initialize a new Git repository
git init

# Add all files to the repository
git add .

# Commit the changes
git commit -m "Initial commit"

# Add the GitHub repository as a remote
git remote add origin <https://github.com/><your-username>/<repository-name>.git

# Push the code to GitHub
git push -u origin main  # Use "master" instead of "main" if you're using an older Git version
Step 4: Configure GitHub Pages
- Go to Repository Settings:
- Open your GitHub repository.
- Click on the “Settings” tab.
- Scroll Down to the GitHub Pages Section:
- In the “GitHub Pages” section, you’ll see a dropdown menu for branch selection. Choose the branch you want to deploy (usually
mainormaster).
- In the “GitHub Pages” section, you’ll see a dropdown menu for branch selection. Choose the branch you want to deploy (usually
- Save the Changes:
- GitHub Pages will provide a link to your deployed site (e.g.,
https://<your-username>.github.io/<repository-name>). - Save the changes.
- GitHub Pages will provide a link to your deployed site (e.g.,
Step 5: Access Your Deployed Site
After a few moments, your static website will be live on GitHub Pages.
You can access it using the provided link, and changes you make to the repository will automatically trigger updates to the deployed site.
💡 Refer: Official documentation
Netlify
Step 1: Create Your Static Website
Step 2: Create a GitHub Repository
- Sign in to GitHub. If you don’t have a GitHub account, sign up at GitHub.
- Create a New Repository:
- Click on the “+” in the top right corner of the GitHub homepage.
- Choose “New repository.”
- Enter a repository name.
- Optionally, add a description.
- Click “Create repository.”
Step 3: Push Your Code to GitHub
# Navigate to your project folder
cd /path/to/my-static-website

# Initialize a new Git repository
git init

# Add all files to the repository
git add .

# Commit the changes
git commit -m "Initial commit"

# Add the GitHub repository as a remote
git remote add origin <https://github.com/><your-username>/<repository-name>.git

# Push the code to GitHub
git push -u origin main  # Use "master" instead of "main" if you're using an older Git version
Step 4: Sign Up for Netlify
- Sign up: If you don’t have a Netlify account, sign up at Netlify.
- Log in: Log in to your Netlify account.
Step 4: Connect to GitHub
- Create a New Site:
- On the Netlify dashboard, click “New site from Git.”
- Choose your Git provider (GitHub, GitLab, Bitbucket).
- Authorize Netlify to access your repositories.
- Select Your Repository:
- Choose the repository you created earlier.
- Configure Your Settings:
- Set the publish directory to the folder containing your files (e.g.,
public).
- Set the publish directory to the folder containing your files (e.g.,
- Deploy Site:
- Click “Deploy site.”
Step 5: Access Your Deployed Site
Once the deployment is complete, Netlify will provide a unique URL for your site (e.g., https://yoursite.netlify.app). You can access your deployed site using this link.
💡 Refer to the official documentation when you are stuck.
Vercel
Step 1: Create Your Static Website
Step 2: Create a GitHub Repository
- Sign in to GitHub If you don’t have a GitHub account, sign up at GitHub.
- Create a New Repository:
- Click on the “+” in the top right corner of the GitHub homepage.
- Choose “New repository.”
- Enter a repository name.
- Optionally, add a description.
- Click “Create repository.”
Step 3: Push Your Code to GitHub
# Navigate to your project folder
cd /path/to/my-static-website

# Initialize a new Git repository
git init

# Add all files to the repository
git add .

# Commit the changes
git commit -m "Initial commit"

# Add the GitHub repository as a remote
git remote add origin <https://github.com/><your-username>/<repository-name>.git

# Push the code to GitHub
git push -u origin main  # Use "master" instead of "main" if you're using an older Git version
Step 3: Sign Up for Vercel
- Sign up: If you don’t have a Vercel account, sign up at Vercel.
- Log in: Log in to your Vercel account.
Step 4: Import Your Project
- Import Project:
- In your Vercel dashboard, click on the “Import Project” button.
- Choose your Git provider (GitHub, GitLab, Bitbucket).
- Authorize Vercel to access your repositories.
- Select Your Repository:
- Choose the repository you created earlier (
my-static-website).
- Choose the repository you created earlier (
- Configure Your Settings:
- Vercel will automatically detect your project settings.
- Set the output directory to the folder containing your files (e.g.,
public).
- Deploy Project:
- Click “Deploy” to deploy your project.
Step 5: Access Your Deployed Site
Once the deployment is complete, Vercel will provide a unique URL for your site (e.g., https://yoursite.vercel.app). You can access your deployed site using this link.
💡 Refer to the official documentation when you are stuck.
AWS S3
Step 1: Create Your Static Website
Step 2: Sign in to AWS and Open S3 Console
- Sign in to AWS: If you don’t have an AWS account, sign up at AWS.
- Open S3 Console:
- Navigate to the AWS Management Console.
- In the “Find Services” search bar, type “S3” and select the S3 service.
Step 3: Create an S3 Bucket
- Create Bucket:
- Click the “Create bucket” button.
- Enter a globally unique bucket name (e.g.,
my-static-website-bucket). - Choose the AWS region for your bucket.
- Click “Next.”
- Configure Options:
- Leave the default settings and click “Next.”
- Set Permissions:
- Enable “Block all public access” for security (you’ll override this for website hosting).
- Click “Next.”
- Review and Create:
- Review your settings and click “Create bucket.”
Step 4: Upload Your Files
- Open Bucket:
- In the S3 console, click on your newly created bucket.
- Upload Files:
- Click “Upload.”
- Add files or drag and drop your static website files.
- Click “Upload.”
Step 5: Configure Bucket for Website Hosting
- Properties Tab:
- In the S3 console, select the “Properties” tab for your bucket.
- Static Website Hosting:
- Click “Static website hosting.”
- Choose “Use this bucket to host a website.”
- Set the index document to
index.htmlor the main HTML file of your site. - Optionally, set the error document if you have a custom error page.
- Save Changes:
- Click “Save changes.”
Step 6: Set Bucket Policy for Public Access
- Permissions Tab:
- Go to the “Permissions” tab for your bucket.
- Bucket Policy:
- Click “Bucket Policy.”
- Add a policy to make the bucket contents public. Replace
"Resource"and"Principal"with your bucket name and your AWS account ID.
{
    "Version": "2012-10-17",
    "Statement": [
        {
            "Effect": "Allow",
            "Principal": "*",
            "Action": "s3:GetObject",
            "Resource": "arn:aws:s3:::my-static-website-bucket/*"
        }
    ]
}
- Click “Save changes.”
Step 7: Access Your Deployed Site
After setting up the S3 bucket for static website hosting, AWS will provide an endpoint URL. You can access your deployed static website using this URL. It should look like:
http://my-static-website-bucket.s3-website-us-east-1.amazonaws.com
Replace “my-static-website-bucket” with your actual bucket name and “us-east-1” with your AWS region.
💡 Refer to the official documentation when you are stuck.
Firebase Hosting
Deploying a static website with Firebase Hosting is a straightforward process, and Firebase Hosting provides features such as automatic SSL, CDN distribution, and easy integration with Firebase services. Here’s a step-by-step guide with an example:
Step 1: Create Your Static Website
Step 2: Set Up Firebase Project
- Sign in to Firebase: If you don’t have a Google account, sign-up and then sign in to the Firebase Console.
- Create a New Project:
- Click on “Add project” or select an existing project.
- Follow the prompts to create a new project.
- Enable Firebase Hosting:
- In your project dashboard, click on “Hosting” in the left-hand menu.
- Click “Get Started” to enable Firebase Hosting.
Step 3: Install Firebase CLI
- Install the Firebase CLI:
- Open a terminal or command prompt.
- Run the following command to install the Firebase CLI globally:
npm install -g firebase-toolsStep 4: Initialize Firebase in Your Project
- Navigate to Your Project:
- Open a terminal. Change to your project directory:
cd /path/to/my-static-website
- Open a terminal. Change to your project directory:
- Initialize Firebase:
- Run the following command and follow the prompts:
firebase init - Choose “Hosting” as the feature to set up.
- Select your Firebase project.
- Set the public directory to the folder containing your files (e.g.,
public). - Choose whether to configure your app as a single-page app (SPA).
Step 5: Deploy Your Site
- Build Your Project:
- If your static site needs a build step, run the build command specified in your project configuration.
- Deploy to Firebase:
- Run the following command to deploy your site to Firebase Hosting:
firebase deploy - Firebase will provide a hosting URL (e.g.,
https://your-project-id.web.app). You can also configure a custom domain if needed.
- Run the following command to deploy your site to Firebase Hosting:
Step 6: Access Your Deployed Site
Once the deployment is complete, your static website will be live on Firebase Hosting.
You can access it using the provided hosting URL.
💡 Refer official documentation when you are stuck.